

Once the construction and assembly was finished and the house stood in real life and before my eyes, it was easy to think that I was practically done. I told myself, starring lovingly at my dream come into fruition, that it was at least 90% complete, just a few finishing details to go. What I found, as I so often do, is that I was dead wrong. A project like this requires a kind of stamina that I am unaccustomed to and I quickly realized that the details were going to take a lot more work and time than I had allotted and that their execution, poor or fine, would really make or break the overall appearance of the house.
And so the process of finishing began. Each time I made a new batch of royal icing I swore it would be my last. Each time I had to change or adapt something that I thought would work and didn’t, I cursed my naïve determination to take this on in the first place. In the end, though, things came together in a way that I was either pleased with or, at the very least, could live with (perfectionist problems).
This is a basic outline of the process of the finishing details:

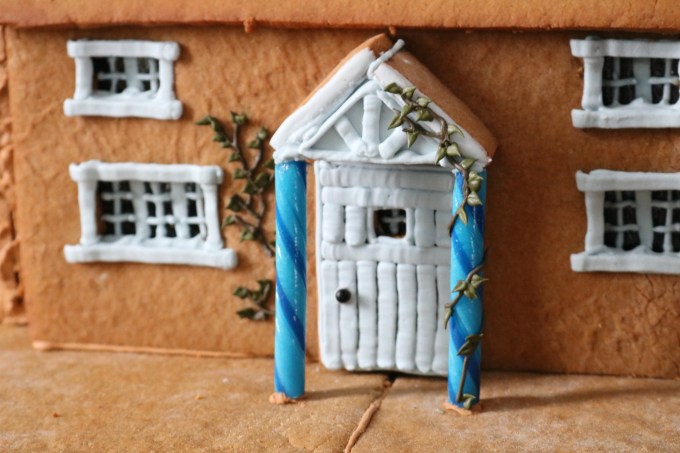
I started the details week by crystalizing some herbs to use as tiny frostbitten plants in the garden. To do this I made a simple syrup (1/2 cup water and 1/2 cup sugar, simmered until the sugar dissolves), then used a pastry brush to paint on a little sticky syrup to some thyme, rosemary, and marjoram, then rolled the coated herbs in granulated sugar and placed on cooling racks to let dry for a few days. I was originally going to use the thyme for the wintery Wisteria vines growing on the house and fence but ended up making a last minute decision to pipe these vines using royal icing (so that I could be more particular with placement and also to add some dimension). It wasn’t exactly easy to pipe these vines on the vertical wall of the house, so if I had to do it again I would have done this step on the flat wall before it went up during construction. Still, I’m really satisfied with my decision to pipe the vines. It turned out to be one of my favorite details.
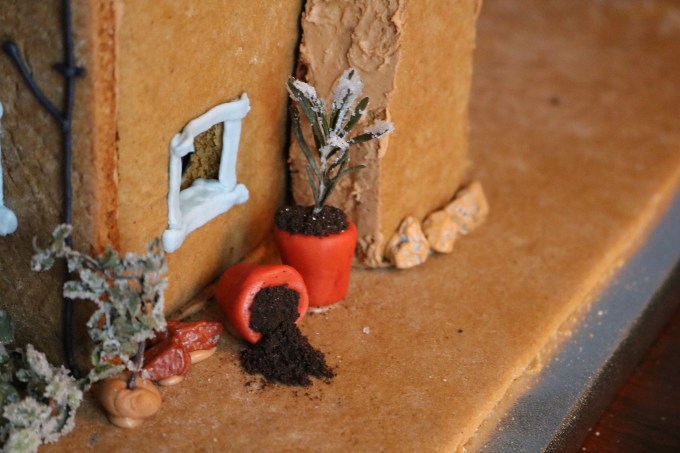
There were other last minute changes, too. Actually, now that I come to think about it, most of the details failed the first time and had to be reworked. I attempted to paint the fondant terra cotta pots with food coloring gel and a brush but I found that it made the pots really sticky and the color didn’t really dry so I ended up just kneading the color into the fondant and it worked 1000x better. I was also going to use long strips of black licorice for the rain gutters on the house but, for whatever reason, the royal icing wasn’t adhering to the licorice so I ended up scrapping the licorice and piping the gutters with the icing instead. I decided I wanted a little bench which I tried to make completely out of royal icing and, as it turns out, is actually very hard to do with just royal icing so I used some of the red candy cane that I used for the chimney caps to make the support for the bench. I’m not crazy with the way it looks but it’s at the back of the house so I’m just letting that go. I had also intended to use the smallest #1 Wilton piping tip to write “Rosehill Cottage” on the fence sign which proved impossible (just “Rose-” took up half the sign) so I ended up using a little food coloring thinned out with water and a quill, of all things. The writing is a little shakier than I would have liked but, again, I had to leave well enough alone.

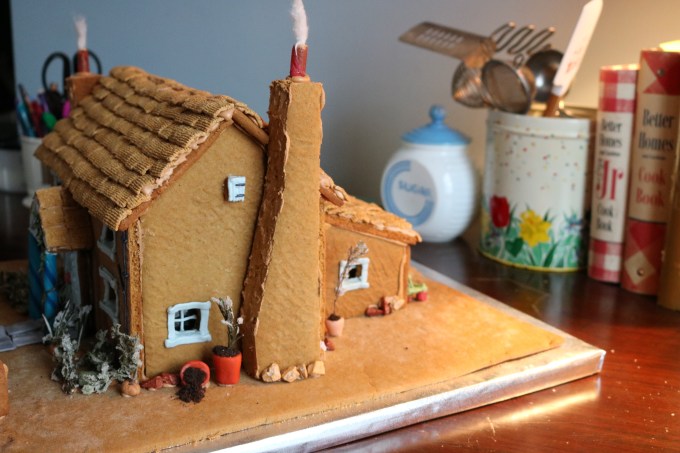
Another wrench in the details was the cotton candy “smoke” for the chimneys. I went to a specialty candy store specifically to buy white cotton candy (which is harder to find than you’d think). I attached little wisps to the chimney caps then awoke the next morning to find them half-gone and slumped over due to the humidity in the air. I ended up using some strands from a cotton ball so it’s the only inedible feature besides the lighting, annoying but tolerable (let’s pretend it’s cotton candy). Lastly, I wanted to make some paver stones for the front walkway and back patio. (The movie set has these stones all the way around the house but because my base is more narrow I decided to just do the front and back). I had thought to do this by piping squares of gray royal icing and then flooding them with wetter icing. It did work, but my first attempt was admittedly a little lazy and I ended up with squares of varying shapes, color, and with big royal icing blobs on the bottom that prevented them from laying down flat. So I tried again, using the exact same method but a much smaller tip to create the border of the squares. I also traced identical squares onto the parchment to use as a guide so they were much more uniformly shaped and colored. (I don’t have pictures of this process but you can see the finished project around the house).
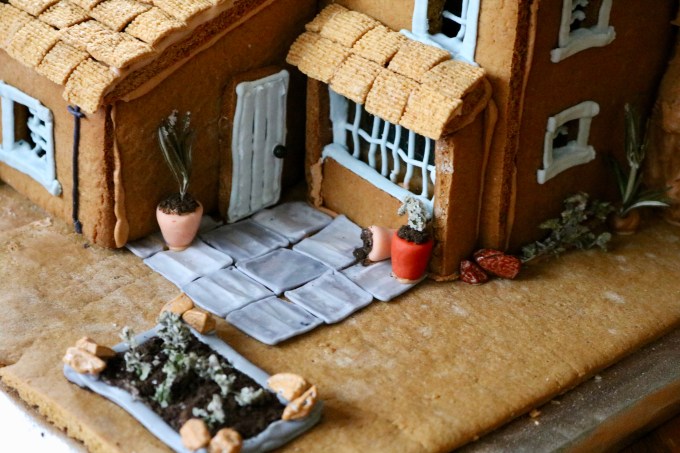 There were a *few* things that, happily, went according to the plan. The roof, shingles provided by Golden Grahams, went on smoothly if not a little laboriously. I worked from the bottom up to the the top, overlapping ever so slightly. The only challenge here was picking out only the flattest Golden Grahams as many of them have a pretty severe curved shape. I need to create a little spray for the door so I used a tiny sprig of dried lavender and piped a little red bow and that was simple enough. I made a small garden in the back by piping a box and filling it with icing and then a layer of crushed Oreos. I also used the crushed Oreos to “fill” the terra cotta pots (by piping a dab of icing then sticking it into the Oreo powder) which I either adorned with some of the crystallized herb vegetation or left as is, or knocked over for that messy, winter-garden look (the idea for this comes directly from a still from the film set). I used tiny sprigs of the crystallized marjoram to make two rows of plants. I used the rest of the crystallized herbs to create a little garden in the front, sticking them down with royal icing or a little brown fondant for a base. I bought a pack of chocolate candy rocks at the previously mentioned specialty candy store and so I finished off the landscaping with haphazardly placing some rocks around the property.
So now it is actually done, barring one small but not insignificant detail of the snow (powdered sugar dusting) that I’m leaving until the final reveal. Until then, I’m using any freed up brain space from completing the house to now worry about keeping it safe from two very misbehaved golden retrievers and also my 3 year old nephew who tried to remove one of the portico pillars so that he could eat it. I feel bad about scolding him but at least he now knows what a portico is. Silver lining, right?
